
Tiki's GoPro HERO9 Settings
- hello-nubear

- Nov 10, 2020
- 7 min read

The GoPros are being researched, ordered, and delivered! There are videos coming out with information each day, but in case you want my take on some settings for your newest GoPro (or even the previous models) look no further! I have broken it down pretty simple. All you need to do is create new presets or edit the existing ones on your GoPro HERO9 and get shooting!
The presets, in general, are already actually pretty solid, but let's go over some information on different settings for different activities. If you don’t have the HERO9, the good news is there are very similar options and not too many things you are missing out on with older models. Follow along below and get as close as you can with the settings you have available!
Please remember that this, along with anything else you see out there, is based on the author's personal preferences. This will hopefully give you a place to start, learn, and then tweak your settings to your personal preferences! Perhaps you will like them exactly as I present them, but I know a lot of people prefer to have some things done differently, and THAT’S OKAY! Alright, let's just dive in, shall we?

Settings that I don’t really mess with:
White Balance: Some like this to be on auto, and for the most part, GoPro does a good job at this. I like somewhere between 5000-6000, and 5500 is a pretty good sweet spot most of the time. I rarely need to change this. The higher the number, the warmer the lighting.
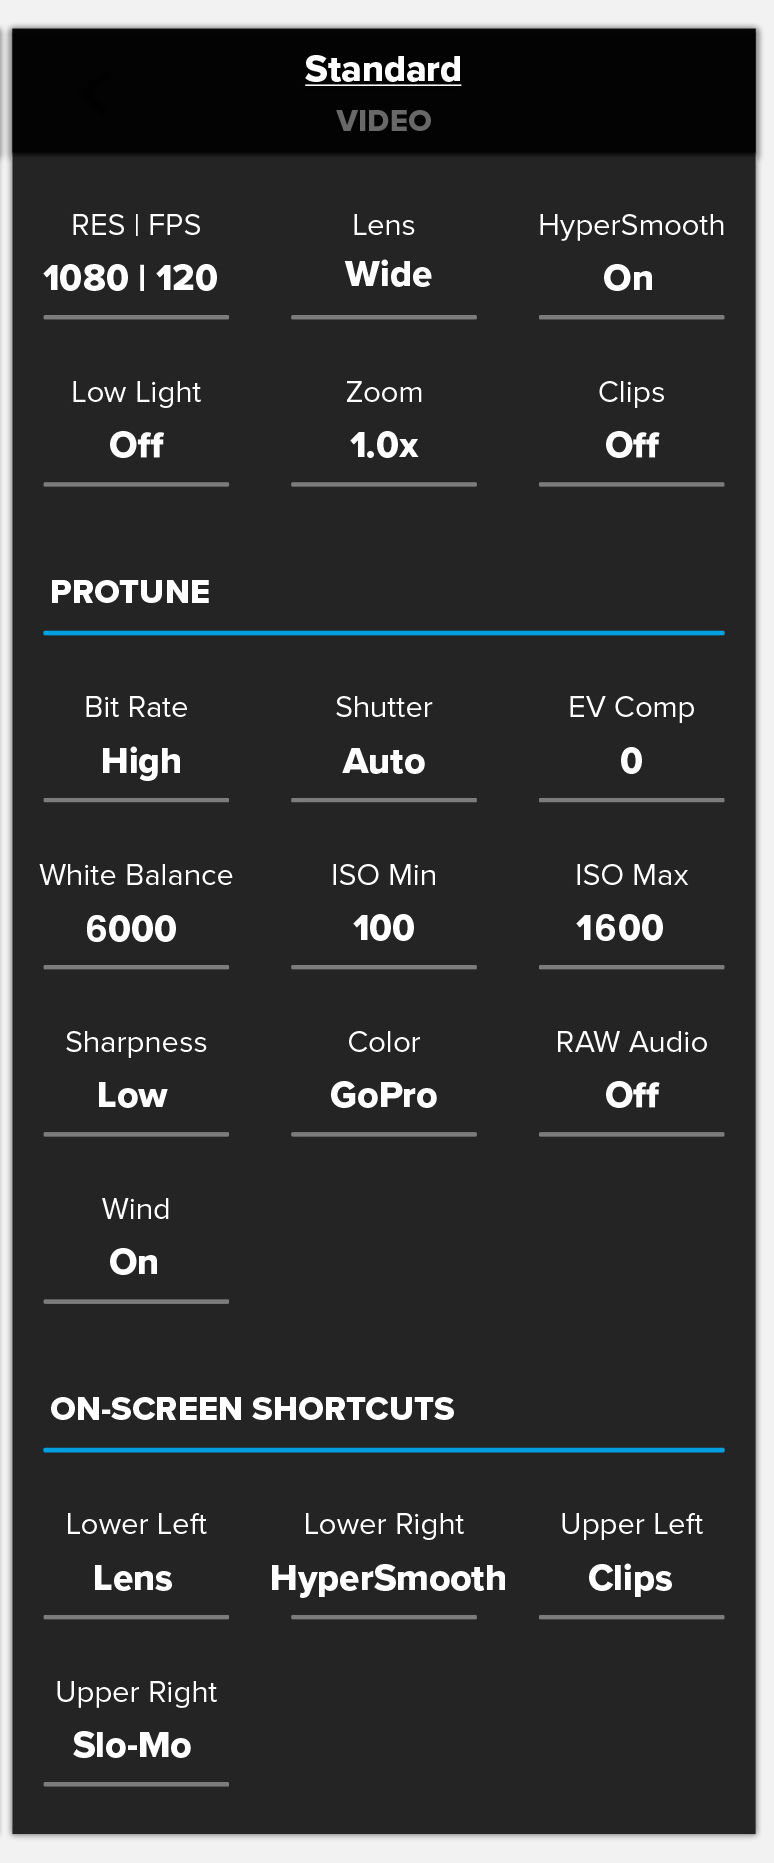
Color: I have always shot in flat before, but I have heard good things about the GoPro Color in the 9, and I may give it a try. Shooting 'flat' takes out a lot of the vibrant colors that GoPro uses when shooting but allows you to edit better in post-production. So, usually flat… but I will test out GoPro Color for a bit and see if how it holds up!
Resolution: I usually only shoot in 1080p. Times for shooting in 4k or 5k would be for cinematic filming or using it to vlog at home, rather than capture adventure and fast-moving moments that you may want to slow down in post-production. These higher resolutions offer better quality but this is only really useful if you are playing your footage on a projector, large screen TV, or something similar. 1080p is still great quality and just about the most popular choice for social media! You are not as limited with the restrictions on what fps you can use as you are with the 4k and 5k settings.
Field of View: I leave my FOV on Wide, but play with Superview if I am doing some really fun action shots (think mountain biking, hiking, skiing, etc). I don’t think I have ever used linear shooting. I like the fisheye look action cameras like the GoPro is known for producing on Wide and Superview.
Shutter Speed: I don't do a lot of night shooting. If I did shoot at night, I would likely be manually adjusting my shutter speed to have longer exposure. The same is true with ISO. I put mine at min 100 and max 1600, and don’t really touch it much unless underwater.
Sharpness: This is one that I used to get backwards when I first started shooting. I figured I wanted to shoot as sharp as possible, but this is not the case. If you shoot in low, you are best off for editing in post. Medium allows for some decent editing, but shooting in sharp doesn’t leave you much room to play in post. No matter what I am shooting, I usually leave my sharpness on low.
Bitrate: If you can afford the space and download ability, shoot in high bitrate. This will provide the best quality, but does take up more storage, and can take longer to download.
Hypersmooth and Boost: I pretty much leave these on at all times because my hands shake often, but keep in mind that it will crop your shot a bit.

Alright, let’s get into more of the action-specific settings that you may want to adjust for.
NIGHT SHOOTING: White balance around 4000-4500K. ISO min at 100, and play with the max when you get to location until you find what you are happy with. This is usually around 400-800. Set your max at this number once you have found it. Recording in Flat color allows you to play with your shot more in post edit, but shooting in GoPro Color isn’t bad at night. Medium sharpness gets you a decent shot with enough wiggle room to still mess around in post if you would like.
VLOGGING ON THE GO: 1080p 30-60fps. You aren’t likely doing much slow motion on this setting, but if you are, consider looking at one of the options below, or playing with the fps. I would leave Hypersmooth and Boost on for vlogging on the go, to give yourself the best quality as possible. Also, make sure to put that front LCD screen to use!
VLOGGING AT HOME: 4k or 5k at 30fps. If you just have your GoPro mounted at home to do reviews, updates, or other vlogs where you aren’t moving around, then shooting at a higher resolution may be something to try here. You can still shoot at 1080p and get a great image, but shooting at 4k or 5k will give you a very crisp shot.
MOUNTAIN BIKING: 2.7K /120fps - 4K/60fps. This is one of those times I would switch to Superview, to show off everything around you! Also, Superview tends to stabilize (or at least look like it stabilizes) the shot a bit more, so bouncing around on a bike could make this FOV more desirable. I'd turn your ISO down as well, so you don’t have issues with exposure as you ride through the day.

UNDERWATER: 2.7K /120fps - 4K/60fps. I like to shoot in a Wide FOV when underwater, as Superview warps things too much for my liking. Turning your ISO down to around 100/100 for shallow water, and 100/800 for deeper water will help with the lighting issues you may face. Always keep the sun at your back if you can to enhance natural lighting and capture color better, and shoot upwards, not down. I like to turn down the EV Comp to -0.5 to reduce skin looking overbright in the sunlight underwater. This just provides a more tasteful view, rather than a bland typical shot of looking down from the surface. A couple of other pointers… turn Screensaver and Auto-Off to NEVER, so you don’t have to worry about your screen going black while underwater. If you find that your colors are still getting washed out, look into a red filter. It will help bring back the washed-out colors that you experience underwater.

SURFING/SKIING: 2.7K /120fps - 4K/60fps. Try to film with the sun at your back if you can, as this will help keep the color in your shot and illuminate your subject the best. Sometimes if the sun is behind the wave, you can still get a sick shot of the sun coming through the water and lighting up your shot. Make sure Hypersmooth and Boost are on, to calm your shot while out in the waves.
DRONE SHOTS: 2.7K /120fps - 4K/60fps. This may be one you want to play with as you go. If you really want to be able to slow things down, turn up your fps. You may want Superview for your FOV on this as well, but if it looks like too much for your liking, take it back down to Wide. Keep in mind your ISO Max for what and where you are shooting. It likely should be put down to about 800, but you may need to mess with this on your own and find your favorite.
SUNSETS: 1080p and 30fps. For sunset or any low light shots, it is very important that you adjust your ISO closer to the following settings of ISO min at 100 (always) and the max at around 100 as well (maybe 200). You can also adjust the white balance to closer to 6500 to get a warmer color or bring it down to get cooler colors if there are already blues and purples in your sunset that you are wanting to play with.
CINEMATIC: 4k or 5k and 24-30fps (60fps). This is for those of you that are getting into or already into cinematic shooting, and really want the play that 4k and 5k allow in post, as well as the crisp quality you're aiming for. Keep in mind that 4k and 5k take longer to download, aren’t compatible for viewing on all devices, and take up more storage space. If all of this is okay with you, go for it!
SLOW MOTION: 2.7K /120fps - 4K/60fps. The higher you go with fps, the more you can break down into slow motion, but the quality also breaks down slightly as well. You could go all the way to 240fps, but it would cause a drag on your quality. My sweet spot is usually 60fps if I am doing something like swimming with sea turtles, and 120fps if I am catching fun jumps off a cliff into the water, or doing more fast-paced action shots. Other settings such as ISO, WB, and Shutter Speed will change based on where you’re shooting (underwater, sunset, lots of brightness, in a jungle, jumping off a boat/cliff, etc).

BEST SCREEN GRABS: 1080p and 120fps or higher (although the higher the fps the worse the quality). Use flat mode (Color) then edit in post after you have found the photos you like most. I would keep your ISO low, and adjust brightness, exposure, and contrast in post.
Well guys, that’s about it for this one! I know there are tons of things to video, but if you didn’t see your favorite hobby listed above, try to think about what it’s most comparable to. If you have any questions, don’t hesitate to reach out! Also, as I mentioned before, these are my personal preferences. Everyone does things differently! If these settings aren’t for you, that’s okay too. It’s always good to try them out for yourself and see what you prefer.
Let me know what you thought of this blog, and what you would like me to cover in the future! You can reach me through comments, email at hello@nu-bear.com, or via social media.
Until Next Time,
Tiki


Comments